Django项目部署
Centos7安装Python3的方法(与python2共存)
依赖包安装
12yum -y groupinstall "Development tools"yum -y install zlib-devel bzip2-devel openssl-devel ncurses-devel sqlite-devel readline-devel tk-devel gdbm-devel db4-devel libpcap-devel xz-devel源文件安装python3
1234567891011# 下载源文件,可根据需要下载不同版本wget https://www.python.org/ftp/python/3.6.4/Python-3.6.4.tar.xzmkdir /usr/local/python3# 解压,安装tar -xvJf Python-3.6.4.tar.xzcd Python-3.6.4./configure --prefix=/usr/local/python3make && make install# 创建软连接ln -s /usr/local/python3/bin/python3 /usr/bin/python3ln -s /usr/local/python3/bin/pip3 /usr/bin/pip3
参考链接 https://www.cnblogs.com/FZfangzheng/p/7588944.html
CentOS7 yum 安装Nginx
安装和启动
123456# 安装sudo yum install -y nginx# 启动运行sudo systemctl start nginx.service# 设置开机启动sudo systemctl enable nginx.service相关目录
12345# 网站默认路径 /usr/share/nginx/html# 默认站点配置 /etc/nginx/conf.d/default.conf# 自定义Nginx站点配置文件存放目录 /etc/nginx/conf.d/# Nginx全局配置 /etc/nginx/nginx.conf# Nginx启动 nginx -c nginx.conf自定义站点CONF
123456789101112131415161718server {listen 80;server_name www.jiushupuzi.com;charset utf-8;access_log /usr/share/nginx/html/baijiacaipu/log/nginx_access.log;error_log /usr/share/nginx/html/baijiacaipu/log/nginx_error.log;client_max_body_size 75M;location /assets {alias /usr/share/nginx/html/baijiacaipu/assets;}location / {include /etc/nginx/uwsgi_params;uwsgi_pass 127.0.0.1:8000;}}建立软连接
1sudo ln -s /usr/share/nginx/html/baijiacaipu/conf/nginx.conf /etc/nginx/conf.d/baijiacaipu.conf
数据库安装 MariaDB
安装和启动
12345678910# 安装yum -y install mariadb mariadb-server# 启动systemctl start mariadb# 设置开机启动systemctl enable mariadb# 简单引导配置mysql_secure_installation# 完成mysql -uroot -pMariaDB字符集配置
文件/etc/my.cnf,在[mysqld]标签下添加
12345init_connect='SET collation_connection = utf8_unicode_ci'init_connect='SET NAMES utf8'character-set-server=utf8collation-server=utf8_unicode_ciskip-character-set-client-handshake文件/etc/my.cnf.d/client.cnf,在[client]中添加
1default-character-set=utf8文件/etc/my.cnf.d/mysql-clients.cnf, 在[mysql]中添加
1default-character-set=utf8
重启命令
1systemctl restart mariadb字符集查看SQL
12show variables like "%character%";show variables like "%collation%";用户创建和权限授权
123456789# 创建用户命令create user username@localhost identified by 'password';# 直接创建用户并授权的命令grant all on *.* to username@localhost indentified by 'password';# 授予外网登陆权限grant all privileges on *.* to username@'%' identified by 'password';# 授予权限并且可以授权grant all privileges on *.* to username@'hostname' identified by 'password' with grant option;#其中只授予部分权限把其中all privileges或者all改为select,insert,update,delete,create,drop,index,alter,grant,references,reload,shutdown,process,file其中一部分。
uwsgi
安装
12sudo yum install python-devel gccsudo pip3 install uwsgi配置uwsgi.ini
1234567891011[uwsgi]socket = 127.0.0.1:8000chdir=/usr/share/nginx/html/baijiacaipumodule=baijiacaipu.wsgimaster = trueprocesses=2threads=2max-requests=2000chmod-socket=664vacuum=truedaemonize = /usr/share/nginx/html/baijiacaipu/log/uwsgi.log执行
1/usr/local/python3/bin/uwsgi --ini /usr/share/nginx/html/baijiacaipu/conf/uwsgi.ininginx中uwsgi配置文件路径
1/etc/nginx/uwsgi_params
supervisor
- 当前3.x版本尚不支持python3,但是可以在python2下运行supervisor【此时代码可以是2也可以是3,不影响】
安装
1sudo pip install supervisor配置文件
1234567891011121314;[include];files = /relative/dictory/*.ini[program:baijiacaipu]command=/usr/local/python3/bin/uwsgi --ini /usr/share/nginx/html/baijiacaipu/conf/uwsgi.inidirectory=/usr/share/nginx/html/baijiacaipu/startsecs=0stopwaitsecs=0autostart=trueautorestart=truestdout_logfile=/usr/share/nginx/html/baijiacaipu/log/supervisord_stdout.logstderr_logfile=/usr/share/nginx/html/baijiacaipu/log/supervisord_stderr.log[supervisord]启动,通过supervisord管理启动和配置supervisor本身
1supervisord -c /usr/share/nginx/html/baijiacaipu/conf/supervisord.conf通过supervisorctl来管理使用supervisor启动和管理的自身的一些应用
12345supervisorctl shutdown # 关闭supervisorctl start program_name #启动应用supervisorctl reload #重启# 查看supervisor运行状态ps -efH|grep supervisor
CentOS开启zsh
安装zsh
123456sudo yum install zshcat /etc/shellschsh -s /bin/zshecho $SHELL# 重启系统之后生效reboot安装oh-my-zsh
123wget https://github.com/robbyrussell/oh-my-zsh/raw/master/tools/install.sh -O - | sh# 配置 .zshrc# 增加别名 alias ll='ls -l'
其他
sys.setdefaultencoding(“utf-8”) 这种方式在3.x中被彻底遗弃
Nginx下Django Admin界面Css、JS丢失问题解决方法
settings.py 中设置STATIC_ROOT路径之后执行命令 python manage.py collectstatic,会生成静态文件到目录中
CentOS下使用yum安装pip
12sudo yum -y install epel-releasesudo yum -y install python-pipProvide a simpler way to default runserver IP/port to 0.0.0.0:8000
1python manage.py runserver 0.0.0.0:8000pip install error 在Python package下载中遇到ReadTimeoutError: HTTPSConnectionPool该怎么办
国内镜像
1pip install -U virtualenv --index https://mirrors.ustc.edu.cn/pypi/web/simple/-
1pip install (path)/pip-8.1.2-py2.py3-none-any.whl
参考链接
- Centos7安装Python3的方法 https://www.cnblogs.com/FZfangzheng/p/7588944.html
- CentOS 7 yum 安装 Nginx https://blog.csdn.net/u012486840/article/details/52610320
- CentOS 7.0 使用 yum 安装 MariaDB 与 MariaDB 的简单配置 https://www.linuxidc.com/Linux/2016-03/128880.htm
- centos开启zsh之旅 https://my.oschina.net/shyann/blog/426004
- Setting up Django and your web server with uWSGI and nginx https://uwsgi-docs.readthedocs.io/en/latest/tutorials/Django_and_nginx.html
uWSGI+django+nginx的工作原理流程与部署历程
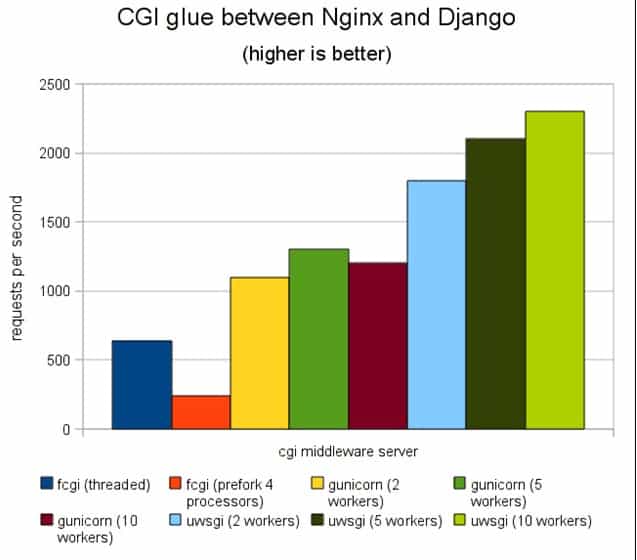
https://blog.csdn.net/c465869935/article/details/53242126CGI glue between Nginx and Django
